Congratulations, you are now signed up and ready to start with our online scheduling software!
This guide will walk you through the functionalities and parts of the product.
It will also show you the key steps to get your business up and running on 10to8.
Our user interface is easy to navigate and gives you full control over the settings. Please note, all changes made are immediately effective.
SECTIONS
- Business Details
- Setting up Locations
- Setting Up Calendar Sync
- Connecting Zoom/MS Teams
- Creating a Service
- Setting up Messaging
- Basic Calendar Navigation
- Basic Inbox Navigation
- Your Booking Page
Business Details
To start with, head to 'Set Up' > Business Details'.
Fill in the section with the general information about your business. Business name, phone number, and website saved under this section will show on your home page:

You can save a contact email address too in 'Configuration' > 'Online Booking' > 'Booking Page' > 'Business Details'.
Make smart use of the 'Business Description' section provided! Here you can share with the public any helpful information. Tell them about seasonal closures, offers, or if you require a deposit upon booking.
Setting up Locations
On 10to8 you can offer your services at three different locations: At Business Premises, Online/Phone and At Client's Address.
You can create unlimited premises and assign as many services as you want to each location.
You can enable your locations in 'Set Up' > 'Locations'. Just move the toggle either right or left to enable or deactivate a location:
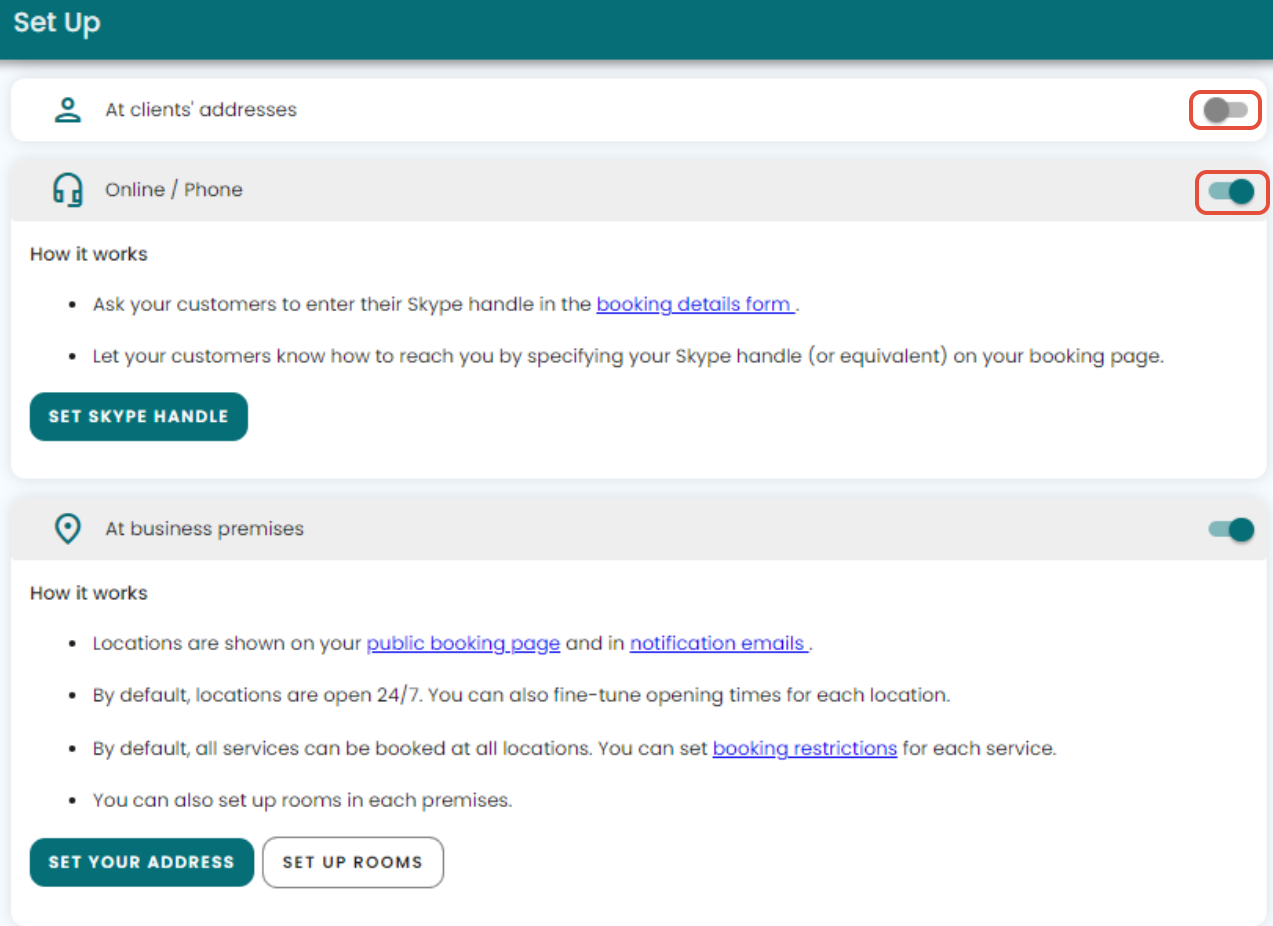
If you need to create business addresses, you can do that on the 'Premises' page.
The locations and addresses saved on those pages will appear on your booking page. Individual addresses or locations can be removed at any time from those sections.
You also have the ability to rename the 'Online/Phone' location to better suit your business needs. To rename this location, head to 'Locations' > 'Premises', click onto the 'Online/Phone' location, click 'Edit', and then enter the new name for this location. When saved, it will change the appearance of the 'Online/Phone' location on your public booking page.
Combination of locations  On a Free Plan, you can assign your services only to one location at a time. Also, you can only assign your availability to All locations.
The Grow Plan will unlock for you the feature 'Combination of above'. This will enable you to assign one service to multiple locations.
Please note, if you wish to use this setting you will need to contact us at help@10to8.com. Send us the list of locations you want to assign to your services and we will handle this for you.
Likewise, if you have multiple premises and wish to restrict services to one or more of them, we can help with that too!
The Grow Plan will also give you the ability to take bookings at different places on different days or at different times during the day.
At Client's Address
 On a Bigger Business Plan or above, you can set up mobile bookings, and offer your services at the customer's address.
To see how to set up your services like home visits and create your availability around a radius, please go to this article.
Setting Availability
The dedicated page to change your working hours is 'Set Up' > 'Availability'.
System admins can set up or amend working hours for any staff members. While staff with non-system admin rights can only manage their own working hours.
Your available hours will limit the slots that your customers can view and book online. You can still force the availability at need when manually booking a customer in your diary.
Once on your Availability calendar, go to the date or the first date of the date range you need to adjust. Then click on the card with the little pencil icon. On the right-hand side, a window will appear. From there, you can enter your working hours. They can be customized by visibility, service type, or location (for location-specific hours see here).

Simply enter the start and end times of your working day if you work consecutive hours during the day and allow your customers to book any available slots during those hours.
As an alternative, if you want customers to book at specific times (for instance on the hour or half an hour), you'll need to create every single slot i.e. 9:00 AM-10:00 AM, 11:00 AM-12:00 PM, 12:30 PM-1:30 PM, etc
NOTE: Please remember to include in your working hours any Buffer or Travel time added to the service's duration.
The availability can also be set either to Public or Private (organization level).
Finally, you are also able to create service-specific availability. Find more here.
This setting mainly controls one-to-one services.
You will need to schedule slots for Class bookings directly on the staff's diary:

Location-Specific Availability
 If you want to decide on what days or times you want to work at different places, the Grow Plan is the right for you!
On this plan, you have the ability to assign your working hours to specific locations.
Setting Up Calendar Sync
Our Calendar Sync integration will help you optimize your availability across all your calendars while connecting your 10to8 diary with your external calendar programs.
10to8 currently syncs with the following providers:
- iCal
- Exchange
- Office 365
- Outlook.com
- Google Calendar
To set up your Calendar Sync:
1. Make sure you enable bookings in the staff member's profile under 'Set Up' > 'Staff' > specific staff member:
 2. Go to 'Integrations' > 'Calendar Sync'.
3. Select the staff member from the drop-down menu.
4. Click on 'Activate calendar sync'. This will take you to Cronofy (our calendar sync provider). Follow the steps prompted on the page to connect to your calendar.
5. If you wish to sync more calendars, click on the 'Activate Calendar Sync for more calendar providers' button.
Once completed, the 1st calendar of each connected calendar will automatically sync.
The others require you to set them up manually. You will have the following options:
- Sync 10to8 appointments into your external calendar.
- Sync your external calendar appointments into 10to8.
Also, for both options, you can choose whether you want to sync the busy times only or all information about the booking as well.
NOTE: Our integration does not support Calendar Sync with shared calendars.
Also, only 10to8 appointments will sync into your personal calendar. We currently do not sync blocked or travel times booked via the 10to8 Calendar.
Connecting Zoom/MS Teams
Virtual meetings have become the new reality and we have got you covered!
10to8 offers integration with Zoom and Microsoft Teams video conferencing tools, and we allow all staff to have both enabled under their account.
Both tools work exclusively with services assigned to the location 'Online/Phone'.
You can set up your Zoom and MS Teams in 'Integrations' > 'Zoom Conferencing' or Microsoft Teams'.
Creating a Service
To create your services, please go to 'Set Up' > Services'.
On 10to8 you can create two types of services: 1-to-1 for individual appointments, and class bookings for group appointments. There is no limit to how many services you can add to your organization.
Each service has its specific and customizable settings. Duration, location, online booking options, cancellation or changes policy, or payment options.
It is super simple to assign or remove staff from each service, so you do not have to do it from the staff's profile.

The staff's ability to create or change services depends on their specific staff permissions. System admins can manage those permissions in each staff's profile:

Setting up Messaging
10to8 will help you communicate timely and effectively with your customers. Whether before or after an appointment, we've got you covered!
In 'Configuration' > 'Messaging', you can set up automated booking notifications for your customers and staff.
With every booking, 10to8 will email the appointment details, including date, time, and location.
Staff can enable email notifications for new bookings and cancellations. They can also set up email or desktop reminders for the appointments booked with them.
Please note that 10to8 will only send notifications to the staff assigned to the booking. If system admins want to get notified of bookings made with their staff, they need to add their own contact to the staff's profile. Example:
 The messaging set up on this page will be applied at an account level.
Individual staff members who wish to disable their booking notifications must remove their contact information from their staff profile.
Our Customer messaging feature allows you to send email and SMS notifications to your customers about their bookings.
You can set up the following notifications:
Email:

SMS:

On 10to8, you can also create both email and SMS reminders and follow-up notifications!
Keeping customers informed of their appointments has proven to significantly reduce no-shows. So make the most out of our automated scheduling system!
SMS Booking Notifications
 On a Basic Plan or above staff can also enable SMSs for new bookings, cancellations, and reminders.
Basic Calendar Navigation
10to8 will generate a calendar for every staff member with bookings enabled.
You can open your Calendar from the left-handed sidebar within your account. The diary gives you an overview of all bookings assigned to a staff, as well as their available times.
If you click on the symbol as indicated in the screenshot below, you'll get to the Settings screen. On here you can select your calendar's view preferences.

To open up the calendar of one staff, please select the name from the Select staff bar at the top-right of the page.
System admins or staff with permission to view all team bookings and attendees can select and view multiple staff.
If you need to make a booking or block time in your diary, you can use one of the two icons below. A right-handed panel will pop up for you to save the details about the booking.

Basic Inbox Navigation
10to8 has designed your Inbox to help you stay on top of all booking notifications and customer communications.
It's super easy to navigate and has a bunch of easy-to-use features. Simply go to the 'Inbox' tab to get to your Inbox.
The folders will display how many unread messages or booking requests there are, and you can sort them by appointment time or notification arrival time:

The cards in the Inbox give you at a glance the basic details of the booking: service booked, the staff assigned, date and time. Tags will help you identify more easily the type of request you have received and whether your attention is still needed.
Unread/unopened messages will always be displayed on pale green background, so keep an eye on those to make sure there's nothing you've missed:

Your Booking Page
Click on 'Configuration' > 'Online Booking' to land on the 'Booking Page' section. Here you can customize and preview the page that your customers will use to book with you.

Personalize your page with your own logo and header to increase brand awareness!
The Business Details section manages your business overview. Here, you can also save links to your other social platforms to generate more traffic.
The Advanced Options menu offers various settings that control your customer's booking flow. here you can set up, for example, a redirect link after booking. Or manage your customer's ability to book multiple slots in one go.
We also offer the options to restrict bookings to specific domains or force customers to create a login to book with you.
In Services Setup you can adjust all the specifications about your services. You can also add to each service an interval between slots to give your customers more booking options.
Finally, you can create headers and group your services. This will help you give a nice structure to your online booking page!

Visit our Blog!
Check out our blog articles for more inspiration on how to create a top-performing online booking system, and how to run virtual meetings effectively!